Browsed by
Year: 2016

A First for Everything

A First for Everything

I honestly never thought I’d ever be writing a first blog post, but as they say there’s a first for everything. Blogging and writing and exposing thoughts to the public was never my cup of tea, unlike Cami who thoroughly enjoyed sharing with the world through this medium. It’s interesting to think about the first person that will read this aside from myself. Hello person.

I found it suiting that my first post be today, as it was 3 months ago exactly that the accident took place. A commemorative post to kick off what I’m hoping will be an oasis of thought and adventure, and hopefully inspiration to set forth on your own adventures. If you haven’t already, it would be nice of you to check out Cami’s Story.

I’ve been spending the past few weeks on and off getting ready for a cross country motorcycle trip. A first trip of this sort for me, and it’s been an enlightening experience preparing so far. It’s basically consisted of spending a decent chunk of change on Amazon for gear, reading a bunch about similar experiences, making sure the bike is in decent enough shape to withstand such a trip and stressing over little things like how many pairs of goggles I should bring.

August 8th is my departure date and there’s still a bit I need to figure out, accommodations I need to coordinate, packing list that I need to finalize, etc.. but over the course of the next few days I’d like to recount my preparations for the trip, share my packing list and thoughts on each item, information on my destinations and whatever else comes to mind, so that this can be used as a reference for others that plan on embarking on a similar trip.

My first destination from Chicago is Green Bay, Wisconsin as part of doing the Lake Michigan Circle Tour (or most of it).  I’ll be the first time I’ve ever been to Green Bay and first time I’ll be using couch surfing for a place to stay. I’ll probably dedicate a post to couch surfing and my experiences getting ready to try it out, so more on that later. A first for everything indeed!

Here’s a quick preview of my route. It’s not complete, nor is it 100% accurate, but the general idea is there.

map


Let’s Get Organized – Help on Planning a Road Trip

Let’s Get Organized – Help on Planning a Road Trip

If you’re thinking about planning a cross country motorcycle trip or really any sort of trip, you might not even know where to start. There a few obvious components to travel:

  • Where to go
  • How to get there
  • What to bring
  • Where to stay

With each of these components, I tend to jot down notes on something to start. I carry around a steno pad and pencil and go to town as things come to mind. I also jot things down in google keep, which is probably a better idea since those notes cant get lost and you’ll likely always have your phone with you.

pad

I also like to write stuff down on a whiteboard. I have a few of them in the house and make myself To Do or To Get lists. Again, keep is probably a better idea.

wb
Wow, so brainstorm

Once these methods became unsustainable, I created myself a spreadsheet that works as an itinerary as well. It tracks where I’ll be, how I’ll get there and where I’m staying. I’ve yet to formalize a packing list, though I think I have everything I need at this point.

Damn bitch, you organized
Still needs some filling out 0.0

Here’s a little bit on some of the tools and methods I’ve been using in order to stay organized with regard to these 4 components.

Where to Go

You probably already know all of the places you want to travel, and if you don’t figuring that out isn’t the hardest thing in the world. Keeping track of all of your ideas, must see places and stops along the way is another story.

There are a few cool resources I came across over the last few weeks in planning this adventure that have been helping quite a bit.

Google Route Planner

This might seem like more of a “how do I get there” tool but really it helped me a lot more in learning where to go. Traveling on the motorcycle limits the distance that can be covered in a single day by quite a bit in comparison to a car. In addition, I’m planning on avoiding interstate highways at all cost and taking the most scenic routes possible. This, with the fact that my ass needs stretching about every 60 miles or so, my range is limited. I tried to stay around ~200 miles per day, give or take. Some of my stops are a lot shorter in between and some quite a bit longer. Those longer stops will probably require traveling all day.

Using google route planner made it a bit easier to judge where I needed or should stop based on my 200 mile guideline. Especially neat is the “measure distance” feature (which you can also do on regular google maps too) to get a feel on how far one place is from another. Click the ruler button to start. On google maps, right click anywhere to select “measure distance.”

Click the ruler button ya turkey!
Measuring in action. so wow

Why not just use google maps? There’s a limitation on gmaps that allows a maximum of 10 stops. In route planner, a similar limitation exists for a single stretch of directions, but you can layer multiple sets of directions. If you notice on my map in the post below, the sequence of A-J appears more than once, each representing a new directions layer in the route planner.

First layer of directions containing 10 stops

Here’s a good tutorial that I used to get the hang of route planner.

Once you have your destinations and driving directions set up, you can drag the route to the roads you actually want to use instead of the default fastest route that includes boring highway. Unfortunately there’s no way to “Avoid Highways” and “Avoid Tolls” like you can in regular google maps, and dragging everything around is kind of a pain, but once you get it down its nice to see an overall map of your entire route and especially fun to show friends and family.

Road Trippers

I came across this site after googling who knows what, but was delightfully surprised at all it had to offer. The idea is, you plug in your route and it shows you all sorts of cool things to stop and see/do/eat/whatever along the way. I plan on using it to scope out cool things along my route.

https://roadtrippers.com

How to Get There

I was invited along to a camping trip this last weekend to Newaygo state park in Michigan. Aside from being a great time in general, it was really nice to have a decently long overnight test in preparation for the big trip. Some things I learned:

  1. Turn by turn directions on the phone with a handle bar holster is really nice but not sustainable
  2. It’s bad to rely solely on digital forms of maps
  3. Plan on the trip taking a lot longer than expected

I bought this handle bar mounted phone holster on Amazon thinking I would use it to get to where I needed to go. It was awesome at first, especially navigating through Indiana right next to the lake. Then I had 5% battery left even before I hit St. Joseph. Luckily I packed a solar panel charger too, this one to be exact, but it wasn’t sunny enough (or maybe the charger just sucks, not sure yet) to charge my phone very quickly or hold a charge very long. So every 30-40 miles or so I would have to stop, power the phone on, check the map, try and memorize the next few pieces of instructions and be on my way. The phone would soon die out and there would be just enough juice for me to power it after the next 40 miles.

The new plan is to print instructions based on my proposed route and have a physical copy of them as well. I’ve yet to do so, but I’m thinking of getting a little tank mounted plastic pouch so directions are readily in sight. I’ll also try and grab a map when I can for each state, just to have it tucked away in my backpack.

When I planned my route to Newaygo the night before, google maps suggested about 5.5 hours. Perfect, I thought, should get there around 3-4pm, have tons of time to wind down and relax before it gets dark. It was actually more like 7-8pm when I showed up. With stopping so much to gas up, stretch, figure out my next few turns and along with the time zone change (which I totally forgot about, don’t forget about that…) it wound up taking closer to 7 hours, plus the hour I lost crossing into Eastern time.

Packed up for weekend trip in Michigan


What to Bring

I’ve mentioned a few things here and there so far, but this category warrants an entirely separate post, maybe two. Stay tuned…

Where to Stay

This entirely depends on your budget, what you’re looking to get out of a trip, how much you like the outdoors and people, etc… I mentioned in my first post that Green Bay will include the first time I’ve used couch surfing. I’m quite excited to try it out but I’m sure its not for everyone. I’ll plan on a detailed couch surfing post and some notes on my other accommodations soon as well.


A Little DIY – How I Made a Motorcycle Luggage Rack

A Little DIY – How I Made a Motorcycle Luggage Rack

One of the first pieces of gear I began searching for was a luggage rack to put onto the back of the bike. Nothing too extravagant, just a little extra space to tie down a gas can if need be. A lot of time searching yielded no results. I read what were essentially rumors of a specific rack that would fit my 1985 Honda Shadow vt700c, but nothing I could find for sale, especially not for a reasonable price.

Armed with a loosely visioned idea of what I wanted to make, I headed to Home Depot. Here’s what I grabbed:

  • 8 ft. piece of aluminum channel stock – $10
  • box of 1/2 inch self tapping screws – $5
  • 4-5 packages of galvanized L brackets – $20

I had a general idea of where I wanted the rack to sit – above the taillight enough so that a vehicle behind me can still see it, but not so high that I couldn’t get the tool box out of the seat.

Speaking of taillight, a prerequisite to this project was re-positioning the license place and license plate light so that it sat underneath the taillight instead of above, the light pointing down now instead of up. There are two holes where a Honda Emblem once sat (mine was long gone) that the plate bracket screws right into. I clipped the wires leading to the light and extended them with some extra wire I found laying around in my brother’s obnoxiously messy basement shit-nest to reach it’s new home.

Two empty holes where the plate was mounted previously
Two empty holes where the plate was mounted previously. Also later fixed my floppy turn signal.

So back to my supplies. I cut a single 12 inch piece of the stock, thinking this was the length I wanted coming out from the back. After a lot of standing there holding up the piece to the back,  I decided maybe that was a little too large. The dimensions of the rack wound up being around 9.5” x 10.5” of usable space and the side rails extend about 12” total.

After more staring and contemplating, I decided how and where I thought things should be mounted and started on making the rack itself.

Measure stuff, cut stuff, screw stuff, repeat

Pretty straight forward thus far. I used a hack saw with a fine tooth blade while the stock was clamped to the deck railing (sorry mom ^_^). Self tapping screws made it a cinch to piece together with the L brackets. Nothing had to be perfectly cut to size since the brackets kind of took care of squaring things up.

Rack itself donezo
Rack itself donezo

Now to figure out how to mount it. I really thought about getting some longer screws and drilling right into the side of the aluminum sissy bar, but didn’t want to deface it that badly. I compromised with drilling into a piece of the sissy bar that is under the seat and using an L bracket to connect the bike and the luggage rack.

rack3

Attaching the rack itself to this at a slight angle made it decently sturdy, but not very trustworthy. Needed some extra support, so I fashioned some support pieces that hooked in at a 45 degree angle, screwing the bottom part right into the bike (though its fairly low and kinda out of sight. Still hurts inside a little)

The pain is real
The pain is real
Finished product
Finished product

My weekend trip to Michigan was a good verification on it’s integrity. Doesn’t even look that bad for around 35 bucks and few hours of work.

Packing List Part 1: Camping Gear

Packing List Part 1: Camping Gear

Since the list is decently long and I have comments on most of the stuff I decided to bring along, I’m splitting this into 5 parts:

  1. Camping Gear
  2. Clothing
  3. Riding Gear
  4. Electronics & Necessities
  5. Tools & Junk

Camping gear was initially kind of tough since there is only so much room on the bike. Motorcycle camping seems great, I just didn’t have a lot of good supplies for it. I spent a lot of time on Outdoor Gear Lab reading reviews and figuring out what is best to bring along. Here’s a list along with links to Amazon if you’re interested in picking anything up. I’ll follow up with comments on some of the items after the list.

Spread out on da flo

Sleeping Bag

This is something I would have wanted to upgrade had I not already spent way too much money on other junk. A key part of motorcycle camping seems to be packing light and having enough room for everything. Its almost like backpacking I guess. My bag is from a few years ago, bottom of the line Ozark Trail. Having something that compacted smaller would be nice but this will suffice.

Sleeping Pad

My first choice was the Sea to Summit Ultralight mat but some shipping delays had me cancel the order and pick up the Therm-a-Rest Neo Air Venture instead. I wound up grabbing a small version since it was the only thing available for Amazon Prime and it is certainly small. Probably for a kid or something, but it’ll work!

Tarp

So based on my weekend excursion to Michigan, the tarp has been useful for 3 things.

  1. Tent entry-way dirt barrier
  2. Wrap up gear when riding in rain
  3. Cover bike during day/night when raining

It might even be worth having two tarps but I’ll stick with the 1 for now. I think the size I have is 5×5 or 6×6 and it’s plenty big while also packing up decently small.

Tent & Footprint

This is a fun one. I spent a long time trying to decide on what tent to bring along, much help from Outdoor Gear Lab. I decided finally to go with the Kelty TN 2. It’s pretty darn small when packed up, wasn’t too outrageously expensive and has this neat “Stargazing” feature. My test with it in Michigan was great. Easy enough to set up (color coded makes things easy for Pete), was great in the rain and breathable at night even with the fly on. 10/10 would buy again. I grabbed the footprint that goes with this tent as well, which is kinda meh. It’s thinner than I’d like but also packs up really small so I dunno. Worth having I suppose.

Camp Chair

I almost decided it wasn’t worth bringing one of these, and I didn’t to Michigan, but after bumming a seat from someone that was kind enough to bring two chairs I thought having something will be good. I’d also like to be able to sit in the tent at night and do some blahggin so I went with a ground chair, the Crazy Creek Hex 2.0. I’ve been using it around the house a little bit and I like it. Comfortable and gets the job done, and the Hex packs up nicely as a little bundle. It’ll be something I have for years to come so I figured it was worth the price tag.

Headlamp

This was actually a Christmas gift from a good bud this last year. He got me the Black Diamond headlamp and is pretty much the Mercedes of the headlamps. At least I can’t imagine a cooler one. Has a neat locking feature so it doesn’t accidentally get turned on in your bag, has a dim close setting, bright af setting and red light as well.

Bike Kickstand Pad

An absolute necessity for camping. This already came in hand while I was in Michigan last week. It prevents the bike from sinking into the ground. For a couple bucks, totally worth it. Here’s the one I nabbed on Amazon.

BEAR MACE

So I have this irrational fear of whats going on outside my tent in the middle of the night. Its silly almost, but the bear thing is a little freaky so I wanted to bring along some extra protection. I ordered this frontiersman bear spray which seems pretty legit. Hopefully I don’t have to use it and hopefully it doesn’t bust open in my bag.

Things That Didn’t Make the Cut

There were a couple of items that I planned on bringing but decided not to for now.

  • Hatchet or Machete
    • Having this as added bear/mystery darkness protection would be nice but I think I’ll be find without it. Good excuse to make friends by asking someone to borrow these items if needed
  • Pillow of Sorts
    • There are some nice inflatable pillows out there but I don’t really think they’re worth the price. Going to live with balling up a jacket or something for now.
  • Hiking Boots
    • I have some totally badass leather boots for riding (more on those later), but I didn’t really think about hiking when I got them. I would have been nice to get something that worked as a hiking boot and riding boot all in one since I don’t think they’re too hot and heavy for hiking. I have some shoes but nothing close to hiking worthy. We’ll see, when I get to the grand canyon if I need them I’ll try and pick em up somewhere.

That’s it! Did I miss something? You have stuff that works better? Wanna talk about bears? I’d love to hear, comment and let me know.

Packing List Part 2: Clothing

Packing List Part 2: Clothing

Alrighty, back for part 2. This should be a quick and easy one. It’s decently self explanatory, though there was still some stuff I needed to pick up. The hardest part with clothing is keeping it light and not packing too much. Also figure, you can always stop and buy a t-shirt along the way but you might not want to ditch your favorite star wars tee that you brought along.

  • 2 pairs of jeans (One of which I’ll be wearing)
  • 3 pairs of long socks (one of which I’ll be wearing)
  • 1 pair of super warm long socks
  • 3 pairs of undies
  • 3 favorite star wars shirts (one of which I’ll be wearing)
  • 1 pair of cargo shorts for hiking and chilling out
  • 1 pair of swim trunks for takin a dip
  • 1 pair of gym shorts for sleeps
  • 1  light polyester pullover
  • 1 pair of long underwear (tops and bottoms)
  • 1 pair of light shoes for when I’m not riding

The long underwear was the only thing I needed buy. I grabbed this from amazon and it fits well. They recommended buying a size larger than you are which is the right thing to do. I almost needed to use it on my way back from Michigan when it was around 67 degrees in the morning. I’m sure it’ll be a good thing to have on hand for the northern states and when I make my way though Montana.

That’s it! Simple enough right? Have a picture:

What did I forget?
What did I forget?
Packing List Part 3: Riding Gear

Packing List Part 3: Riding Gear

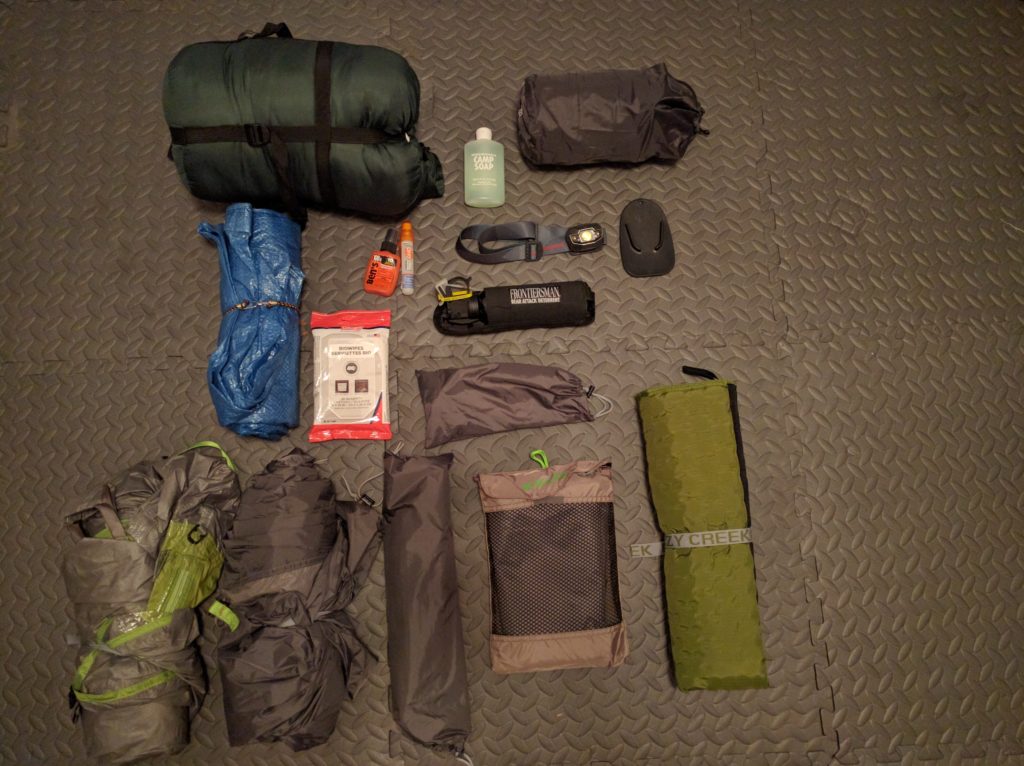
This list is a little more important than clothing and took me a while to assemble all of the pieces I needed. As I found on my weekend excursion to Michigan, comfortable riding gear is extremely important. Here’s what I’m bringing, links to such things if you’re interested, whats on my wish list and some tips I’ve learned along the way. I’ll have comments below the picture on most of the items.

riding gear

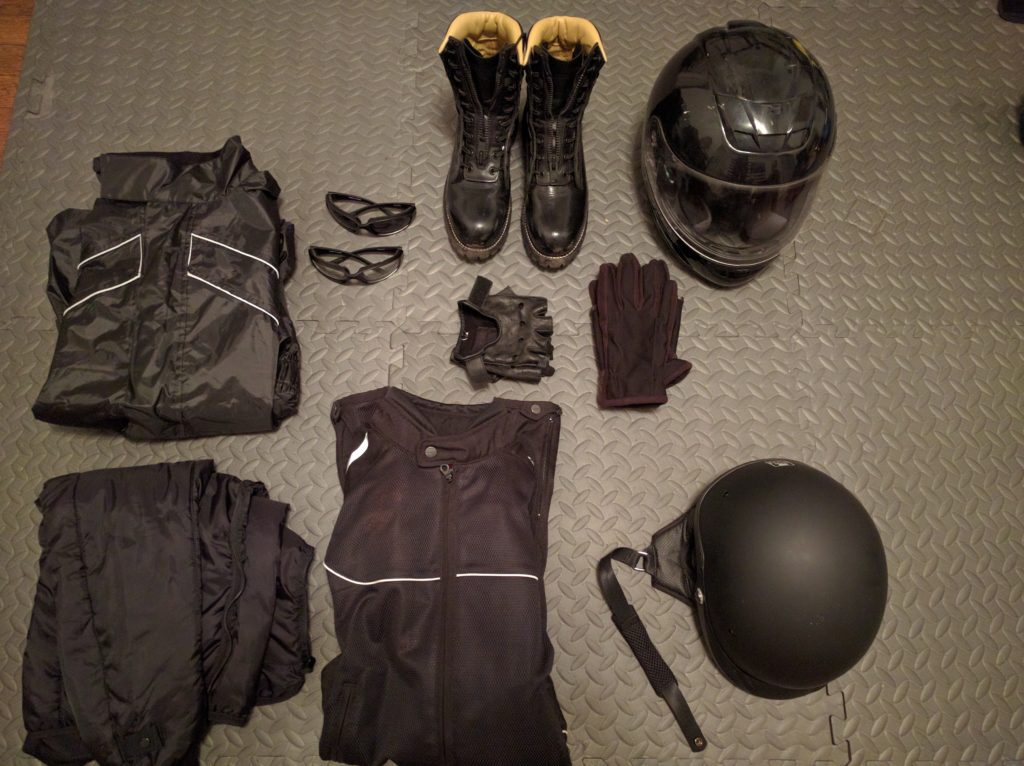
Some thoughts on these items:

Riding Jacket

I would say the golden rule here is to try it on. I was really hesitant to buy a jacket on the internet and I’m glad I didn’t. I stopped in to a local bike shop and tried on a medium version of this Spidi jacket. Usually I’m a small and that’s what I would have ordered online, but I was surprised to find that this thing fit absolutely perfectly. Apparently Italian companies tend to run small, something I had no idea about.

The jacket itself is awesome. Pockets galore, breathes excellently and has arm zippers for going around your gloves if you choose. This particular jacket has a complementary thermal and waterproof underlayer that snaps in. I picked up the thermal portion after the Michigan trip since it was quite chilly at only 67 degrees. It also works as a light walking around jacket if I needed. Overall very happy with the purchase.

Seeing as I’ll be riding a decent portion in the south/southwest, I really wanted something breathable. This jacket is very much so while still maintaining armor on the inside for some protection. Jackets can get really expensive, but this one was reasonable at 200 bucks. An extra 60 for the thermal layer.

Badass Boots

The boots I nabbed are possibly my favorite Amazon purchase in a long time. That being said, they were also a giant pain in the ass.

I opted for the Chippewa Station boots after reading this gentleman’s write up on them for riding. He does a great write up on boots in general found here.

I took a risk by buying these directly from Amazon without trying them on first, but I noticed them listed at only 100 bucks (regularly like 270) in the size I was pretty sure I was so I jumped on it.

They are rock solid, sturdy as hell, totally badass boots and were a  complete nightmare lacing up. They come with 4 laces, all of which you need to use, and a zipper part that is completely detached in the box. There are two different methods of lacing, tutorials found here were most helpful for me, and it was a whole night’s work in adjusting them to be comfortable and capable of actually zipping up.

Now that they’re all set though (and broken in, super stiff at first), I love em. The only worry I have is with heat. Riding from Chicago to Villa Park on the highway in traffic had them heating up pretty good. We’ll see though, I think it’ll be fine. They also give me an extra 2 inches or so in height, so I’m not constantly tippy toeing on the bike, which is nice.

Full Face Helmet

Probably a necessity on this type of trip. It protects from rain and very nice to have when cold. I used mine during a portion of my trip to MI while it started to rain, and on the way home when it was chilly in the morning. I don’t really have a recommendation on which one here, mine is a Good Will purchase from a while back. Much like the jacket though, I’d recommend trying something on in a store to ensure it’s a good fit and comfortable.

Half Helmet

I originally bought this VCAN cruiser half helmet and quickly learned it was a giant piece of shit. Its OK if you’re cruising around town and keeping it under 40 mph, but as soon as I hit cruising speed on the highway it wanted to lift off. So I had to really strap it down tight on my head. It wasn’t super comfortable after about a half hour of riding.

So, lesson learned. Try em on first boys and girls. I read a lot of good reviews about the Bell Pit Boss and decided to check it out at my local bike shop. I’m glad I did and didn’t just order right online, since I probably would have ordered a small but I turned out to need a medium. Best thing is the hard-hat like adjuster which really prevents that ability to lift off like my first one.

I have only one beef that needs squashing with this helmet – the chin strap is super annoying. It was really digging into my neck on the Michigan trip. I wound up buying this chin strap pad and it’s made all the difference.

Riding Goggles

I grabbed this set of cheapos and they’ve done me well so far. I also have a pair of decent igogs with yellow tint that are much better quality, but they’re starting to get a little scuffed and not great for when it’s supper sunny. I’ll probably still bring them along, with a tinted and clear pair of cheapos.

Glurves

The fingerless gloves are great. The pair I got aren’t super great quality. The little “gel” fabric tab annoyed me and ripping it off yielded a gaping hole in the glove. But having the little bit of protection, barrier between hand and grip and still being able to maintain the dextrous nature of bare fingers is great.

My other pair is just an old pair of winter gloves. They have those little pads that allow use of a phone but they’re too big and bulky for that anyway. They’re not the warmest and definitely not water proof. On my wishlist is a good pair of warm/waterproof riding gloves. I never got around to finding a pair that didn’t break the bank, but it’s something to think about in the future.

Rain Gear

Originally I stopped off at an Army Surplus store and grabbed what I thought was a decent set of rain gear. Little did I know that it was actually a really crappy set of rain gear. It was big in some places, small in other places and would have probably melted right onto the pipes.

After realizing my mistake, I opted for the Joe Rocket RS-2 riding set, and coming in at 20 bucks more than I spent on the shitty pair, it was totally worth it. I never even knew a set of rain gear could be classified as “having features.”

Its fits great, form fitting with elastic bands, has heat shield on legs for protection against engine and pipes, ability to unzip pant legs to fit over boot, bottom boot strap to keep from riding up, reflectors and a decently tight neck hole. Love it, would highly recommend. Hopefully I don’t have to use it though.

Whew, long one, ok that’s it for this time! Lemme know if you have a recommendation on riding gloves in the comments section.

Packing List Parts 4 & 5: Electronics and Necessities; Tools and Junk

Packing List Parts 4 & 5: Electronics and Necessities; Tools and Junk

This will be a quick one since it’s getting late and tomorrow is the big day. Here’s what’s coming along in the Electronics and Necessities category:

  • 2 Towels; 1 for wiping down Bike and 1 for wiping down Pete
  • Big battery pack to keep phone alive cause Pokemon Go drains the shit out of it
  • 1 Cami Camera with macro lens and extra wide angle lens
  • 1 laptop for blahgin’ and emailin and transferring photos from camera and such
  • 1 first aid kit courtesy of a good bud
  • 1 book for quiet spots
  • 1 bag of ear plugs
  • 1 toiletries bag filled with tooth brush, soaps, etc…
  • 1 flashlight also courtesy of good bud
  • Assortment of cables and such for charging the things
  • 1 start wars themed notebook for writing down thoughts
  • Advil
  • Lighter
  • Pens and pencils for writing things
  • 1 pair of sunglasses for chillin
  • 1 pair of headphones with built in microphone, also courtesy of good bud (he’s really lookin out for me)
  • 1 road atlas courtesy of same good bud (what a guy!)
  • 2 tubes of sunscreen because my white ass turns to lobster very quickly
Picture time is fun
Picture time is fun


Here’s whats coming in the Tools category:

  • Bungee Cords galore
  • Rope
  • Adjustable wrench
  • small and large socket wrench
  • Assortment of sockets
  • Assortment of allen wrenches
  • Pliers
  • Wire Cutters
  • Small Flathead and Phillips screwdriver
  • Larger Phillips Screwdriver
  • 2 Cargo Nets
  • Bag of zip ties
  • Black tape
  • Wire nuts
  • Rubber tube
  • Super Glue
  • Extra bulbs for turn signals (I should have tailight and headlight too, and spark splugs, didn’t get around to getting them)

tools

And Here We Go!

And Here We Go!

Tomorrow’s the day, first step in what I’m hoping will be a lifetime of amazing memories, grand sights and picturesque scenery. I was a little nervous all day, but now I’m completely ready and itching to go. I’m glad to have a friend riding along with me to Green Bay to start things off.

43 stops, 4 national parks, over 10,000 miles of road and 45+ days of travel lie ahead, and I can’t wait.

Here’s the bike all packed up from my test fitting earlier. Camping things in one bag, clothes in another. Gear in one saddle bag, jacket and camera items in the other, electronics and miscellaneous items in the backpack.

DSC_1133

Oh the places I’ll go! See you on the road.

-Pete

Day 1: Sunshine in the Dairyland

Day 1: Sunshine in the Dairyland

The first stop along the journey was Green Bay WI. We decided to keep next to the lake for as long as possible on or way up, which was definitely the right thing to do. It certainly wasn’t the quickest route, but it took us through winding roads, small towns, old pristine neighborhoods, downtown Milwaukee and offered some excellent views of the lake along the way. It was basically Sheridan Rd and 32 for as long it was near the shore.

Waukegan Harbor
Waukegan Harbor


Kenosha WI, who'da thought?
Kenosha WI, who’da thought?

Once we headed inland, it was picturesque Wisconsin farmland for as far as the eye could see. We couldn’t have had a better day with the weather, it was a comfortable temperature for riding and sunshine the whole way. The smell of good ol fashioned farmtown (read: cow shit) persisted throughout.

dat road tho
dat road tho

At one point we were even riding along a road that didn’t have any lines. It’s amazing what you might find by taking “Riverside Dr” or a loosely marked road that looks to go through but isn’t google’s recommended route.

Once we made it to Green Bay, we of course had to check out the actual Bay.

DSC_1147

After relaxing next to the bay for a bit, we decided to check out the nearby Bay Beach wildlife preserve. We are surprised to find an assortment of rescued animals there, including otters, a couger, bobcats and a red fox.

Give that bitch an otter,bitches love otters

Later on we met up and hung out with our couch surfing hosts and attended a neat seminar on health and spirituality. Couch surfing was excellent and I couldn’t have imagined a better start to the trip (thanks again guys if you’re reading!).

Here’s our route for day 1

Screenshot_20160809-093951

Next stop Marquette Michigan. Lake Superior here I come.


Day 2: These Lakes are Pretty Great

Day 2: These Lakes are Pretty Great

Today’s journey started with parting ways. Dylan and I had an awesome breakfast with our couch surfing host, said our goodbyes and went our separate ways; he back to Chicago with a stop at the Harley Davidson museum in Milwaukee and I on the road to my next stop in Marquette Michigan.

A Farewell Bike Selfie

I can’t say enough about this idea of taking the road less traveled. The official Lake Michigan Circle Tour road was highway 41 coming right out of Green Bay, but it was fairly inland and resembled your run of the mill highway. I opted to take some roads that were closer to the lake. Lakeview Rd sounded like a good option.  Despite it’s name though, didn’t really have any lake views. Eventually it turned into highways J, S and Y along the way, running just east of 41 most of the time.

This path did have some great features though, including a pretty neat transformation of scenery. Quickly things turned from farmland to fields of untamed grass and seemingly undeveloped land. I was the only one on these roads for most of the time making for a very serene ride.

The towns I was taken through were excellent. Oconto is perhaps the quietest town on the planet. Nothing seemed to be happening, and if it was you couldn’t hear it. Though I might also be going deaf from the noise of the wind. Nice.

Peshtigo was great. I’m not even sure what it was that made it great, and I didn’t even stop, only road on through. Just the quaint, humble nature of the place, it seemed completely friendly.

Eventually these roads lead back to 41 and you cross over to Michigan in Marinette. Now here’s where it get’s really good, Michigan Route 35. By far the best road I’ve been on so far. It’s just miles of road hugging Lake Michigan, sometimes revealing houses along the lake, sometimes natural, untouched lake shoreline, something I can’t even recall seeing ever anywhere else. Grassy fields are becoming tree lined forests and the lake breeze was like mega bursts of AC on full blast.

Toward the end of the journey on 35 I noticed a brown sign with a Camera on it. Sweet, picture time. A decently long road brought me to a gravel parking lot for something called Portage Point. The waves reminded me more of an ocean than a lake. It was an entire little peninsula of nothing but natural shore.

DSC_1166

This chair is just chillin

The north is definitely pristine. The farther I went, it seemed like the air was just getting fresher. I eventually made it to Marquette and was surprised to see some hills and rock formations here and there. A good change up to the flat land I’ve been on the last 400 miles.

Lake superior is no exception in being pristine.

Clear as can be
Clear as can be

I met up with my couch surfing host, helped finish making the largest batch of pesto I’ve ever seen, had some dinner and jumped in the lake just as it was getting dark.

route2
175 Miles

Day 2 complete. Traverse City here I come.